
Notice
Recent Posts
Recent Comments
Link
| 일 | 월 | 화 | 수 | 목 | 금 | 토 |
|---|---|---|---|---|---|---|
| 1 | 2 | 3 | 4 | 5 | ||
| 6 | 7 | 8 | 9 | 10 | 11 | 12 |
| 13 | 14 | 15 | 16 | 17 | 18 | 19 |
| 20 | 21 | 22 | 23 | 24 | 25 | 26 |
| 27 | 28 | 29 | 30 | 31 |
Tags
- 웹프로그래밍
- 자바스크립트
- 항해99
- 직무부트캠프후기
- PM코스후기
- 데이터분석
- 타이타닉예제
- HTML
- PM코스 후기
- javascript
- PYTHON
- 항해99 PM코스
- 로컬개발환경
- get요청
- IT부트캠프후기
- 파이썬
- CSS
- js
- jQuery
- 당뇨병발병률예제
- 서비스기획
- 서비스기획부트캠프
- 제이쿼리
- PM부트캠프 후기
- 프로덕트매니저
- venv설치
- requests패키지
- fetch
- 항해99PM코스
- temp_html
Archives
- Today
- Total
노엘의 샴슈
[7] 파이썬 시작 + 기초 : python 설치, 기초 문법, requests 패키지 본문
1. python으로 할 것
더보기

- HTML, CSS, JS 파일을 전달하는 역할을 하는 서버를 Python으로 만들 예정.
- 데이터베이스에서 데이터를 받아오고 데이터를 저장하는 과정은 mongoDB를 활용할 것.
2. Python 설치
더보기


1) Python 파일 설치
- https://www.python.org/ftp/python/3.8.6/python-3.8.6-amd64.exe
- 파일을 다운받고
- Add Python 3.8 to PATH 선택하기!
2) Git-bash 다운로드
Git
git-scm.com
- 64-bit Git for Windows Setup 다운로드받고 설치하면 완료!
3) VScode 에서 Python 확장자 설치
3. OpenAPI에서 데이터 받아오기 예제 복습
더보기

1) 데이터를 받아올 URL 확인
- movies라는 key 안에 리스트로 들어가 있음을 알 수 있다!
2) 로딩 후 바로실행 함수 만들어주기
$(document).ready(function(){
  listing();
});

function listing() {
	console.log('화면 로딩 후 잘 실행되었습니다');
}
3) fetch로 불러오고, forEach로 돌면서 데이터 뽑아주기
<head>
	<script>
        $(document).ready(function () {
            loadtemp();
            loadcards();
        })

        function loadtemp() {
            $("#temp").empty()
            fetch("http://spartacodingclub.shop/sparta_api/weather/seoul").then(res => res.json()).then(data => {
                let a = data['temp']
                let temp_html = `<span id="temp">${a}</span>`
                $("#temp").append(temp_html)
            })
        }


        function loadcards() {
            $("#newcards").empty()
            fetch("http://spartacodingclub.shop/web/api/movie").then(res => res.json()).then(data => {
                let movie = data['movies']
                movie.forEach((a) => {
                    img = a['image']
                    title = a['title']
                    desc = a['desc']
                    star = a['star']
                    star_img = '⭐'.repeat(star)
                    comment = a['comment']

                    let temp_html = `<div class="col">
                                        <div class="card h-100">
                                            <img src="${img}" class="card-img-top" alt="..." />
                                            <div class="card-body">
                                                <h5 class="card-title">${title}</h5>
                                                <p class="card-text">${desc}</p>
                                                <p>${star_img}</p>
                                                <p class="mycomment">${comment}</p>
                                            </div>
                                        </div>
                                    </div>`
                    $("#newcards").append(temp_html)
                })
            })
        }
    </script>
</head>
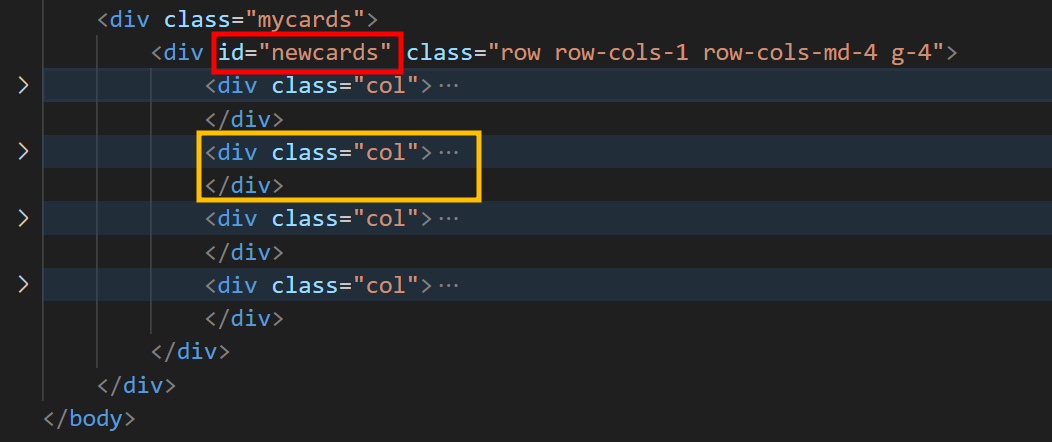
- 우리가 만든 카드들이 들어가야 할 자리는
백틱으로 지정해준 div만큼이 아니라! 그 위에 한 행에 4개씩 카드가 붙는 그 부분이 반복되어야함!
요기서 실수하지 말 것!
문자열 반복법) .repeat()
더보기
'abc'.repeat(-1);   // RangeError
'abc'.repeat(0);    // ''
'abc'.repeat(1);    // 'abc'
'abc'.repeat(2);    // 'abcabc'
'abc'.repeat(3.5);  // 'abcabcabc' (count will be converted to integer)
'abc'.repeat(1/0);  // RangeError
+) 전체코드
더보기
<!DOCTYPE html>
<html lang="en">

<head>
    <meta charset="utf-8" />
    <meta name="viewport" content="width=device-width, initial-scale=1, shrink-to-fit=no" />

    <link href="https://cdn.jsdelivr.net/npm/bootstrap@5.0.2/dist/css/bootstrap.min.css" rel="stylesheet"
        integrity="sha384-EVSTQN3/azprG1Anm3QDgpJLIm9Nao0Yz1ztcQTwFspd3yD65VohhpuuCOmLASjC" crossorigin="anonymous" />
    <script src="https://ajax.googleapis.com/ajax/libs/jquery/3.5.1/jquery.min.js"></script>
    <script src="https://cdn.jsdelivr.net/npm/bootstrap@5.0.2/dist/js/bootstrap.bundle.min.js"
        integrity="sha384-MrcW6ZMFYlzcLA8Nl+NtUVF0sA7MsXsP1UyJoMp4YLEuNSfAP+JcXn/tWtIaxVXM"
        crossorigin="anonymous"></script>

    <title>노엘피디아</title>
    <style>
        @import url("https://fonts.googleapis.com/css2?family=Dongle&display=swap");
        @import url("https://fonts.googleapis.com/css2?family=Nanum+Myeongjo&display=swap");

        .title_all {
            font-family: "Dongle", sans-serif;
            background-color: goldenrod;
            color: white;
            height: 400px;

            background-image: linear-gradient(0deg,
                    rgba(0, 0, 0, 0.1),
                    rgba(0, 0, 0, 0.1)),
                url(https://p4.wallpaperbetter.com/wallpaper/988/646/461/la-la-land-ryan-gosling-emma-stone-hd-wallpaper-preview.jpg);
            background-position: center;
            background-size: cover;

            display: flex;
            flex-direction: column;
            align-items: center;
            justify-content: center;
        }

        .mytitle {
            font-size: xxx-large;
            font-weight: 600;
        }

        .mybtn_comment {
            margin-top: 15px;
            width: 130px;
            height: 40px;
            color: white;
            font-weight: 300;
            font-size: x-large;
            background-color: transparent;
            border-color: white;
            border-radius: 20px;
            border: 2px solid;
        }

        .mybtn_comment:hover {
            border: 2px solid yellow;
            color: yellow;
        }

        .mycards {
            width: 95%;
            margin: 20px auto 0px auto;
            font-family: "Nanum Myeongjo", serif;
        }

        .card-title {
            font-weight: bolder;
        }

        .mycomment {
            color: gray;
        }

        .newpost {
            font-family: "Nanum Myeongjo", serif;
            width: 500px;
            margin: 20px auto 20px auto;
            padding: 20px 20px 20px 20px;
            box-shadow: 0px 0px 3px 0px gray;
        }

        .mybtn {
            display: flex;
            flex-direction: row;
            align-items: center;
            justify-content: center;
            margin-top: 20px;
        }

        .mybtn>button {
            margin-right: 10px;
        }
    </style>
    <script>
        $(document).ready(function () {
            loadtemp();
            loadcards();
        })

        function loadtemp() {
            $("#temp").empty()
            fetch("http://spartacodingclub.shop/sparta_api/weather/seoul").then(res => res.json()).then(data => {
                let a = data['temp']
                let temp_html = `<span id="temp">${a}</span>`
                $("#temp").append(temp_html)
            })
        }


        function loadcards() {
            $("#newcards").empty()
            fetch("http://spartacodingclub.shop/web/api/movie").then(res => res.json()).then(data => {
                let movie = data['movies']
                movie.forEach((a) => {
                    img = a['image']
                    title = a['title']
                    desc = a['desc']
                    star = a['star']
                    star_img = '⭐'.repeat(star)
                    comment = a['comment']

                    let temp_html = `<div class="col">
                                        <div class="card h-100">
                                            <img src="${img}" class="card-img-top" alt="..." />
                                            <div class="card-body">
                                                <h5 class="card-title">${title}</h5>
                                                <p class="card-text">${desc}</p>
                                                <p>${star_img}</p>
                                                <p class="mycomment">${comment}</p>
                                            </div>
                                        </div>
                                    </div>`
                    $("#newcards").append(temp_html)
                })
            })
        }


    </script>
</head>

<body>
    <div class="title_all">
        <h1 class="mytitle">노엘피디아</h1>
        <div>
            <h3> 현재 서울의 날씨 : <span id="temp">20</span>도 </h3>
        </div>
        <button class="mybtn_comment">영화 기록하기</button>
    </div>
    <div class="newpost">
        <div class="form-floating mb-3">
            <input type="email" class="form-control" id="floatingInput" placeholder="name@example.com" />
            <label for="floatingInput">영화 URL</label>
        </div>
        <div class="new_star">
            <div class="input-group mb-3">
                <label class="input-group-text" for="inputGroupSelect01">별점</label>
                <select class="form-select" id="inputGroupSelect01">
                    <option selected>-- 선택하기 --</option>
                    <option value="1">⭐</option>
                    <option value="2">⭐⭐</option>
                    <option value="3">⭐⭐⭐</option>
                    <option value="4">⭐⭐⭐⭐</option>
                    <option value="5">⭐⭐⭐⭐⭐</option>
                </select>
            </div>
        </div>
        <div class="form-floating">
            <textarea class="form-control" placeholder="Leave a comment here" id="floatingTextarea2"
                style="height: 100px"></textarea>
            <label for="floatingTextarea2">Comments</label>
        </div>
        <div class="mybtn">
            <button type="button" class="btn btn-dark">기록하기</button>
            <button type="button" class="btn btn-outline-dark">닫기</button>
        </div>
    </div>
    <div class="mycards">
        <div id="newcards" class="row row-cols-1 row-cols-md-4 g-4">
            <div class="col">
                <div class="card h-100">
                    <img src="https://img1.daumcdn.net/thumb/C408x596/?fname=https%3A%2F%2Ft1.daumcdn.net%2Fmovie%2F0e371de6f342a66143c49af3dd2b204342bbb5aa"
                        class="card-img-top" alt="..." />
                    <div class="card-body">
                        <h5 class="card-title">라라랜드</h5>
                        <p class="card-text">
                            황홀한 사랑, 순수한 희망, 격렬한 열정…<br />
                            이 곳에서 모든 감정이 폭발한다!
                        </p>
                        <p>⭐⭐⭐⭐⭐</p>
                        <p class="mycomment">City of Stars</p>
                    </div>
                </div>
            </div>
        </div>
    </div>
</body>

</html>
4. Python 기초 문법
1) bash 로 돌려주기
더보기


- Ctrl + Shift + ` : 터미널 열기
터미널 : 사용자가 텍스트로 명령어를 입력하면, 결과를 텍스트로 화면에 출력해주는 도구! - bash로 선택되어있는지 확인하기
- 실행할 때는 파일 오른쪽 클릭 > Run Python > Run Python File in Terminal
2) 기초 문법
더보기
1) 변수 + 기본 연산
a = 3
b = a
a = a + 1

num1 = a*b
num2 = 99
2) 자료형
- 변수에는 어떤 형태의 자료도 들어갈 수 있다
- 문자열, 숫자, boolean 형, 리스트, 딕셔너리
name = 'bob'
num = 12

is_number = True

a = ['Noelle', 'Pauline', 'Sam']
print(a[0]) #Noelle

b = {}
b = {'name' : 'Noelle', 'age' : 20}
print(b['name']) #Noelle
3) 함수
- 파이썬에서는 전체를 묶어주는 괄호가 없는 만큼 들여쓰기가 매우 중요하다!
def hey():
	print("헤이")

hey()

def sum(a,b,c):
	return a+b+c

result = sum(1,2,3)
print(result) #6
4) 조건문
age = 25

if age >= 20:
	print("Adult")
else:
	print("Teen")


grade = 49

if grade >= 80:
    print("A")
elif grade >= 60:
    print("B")
elif grade >= 40:
    print("C")
else:
    print("D")
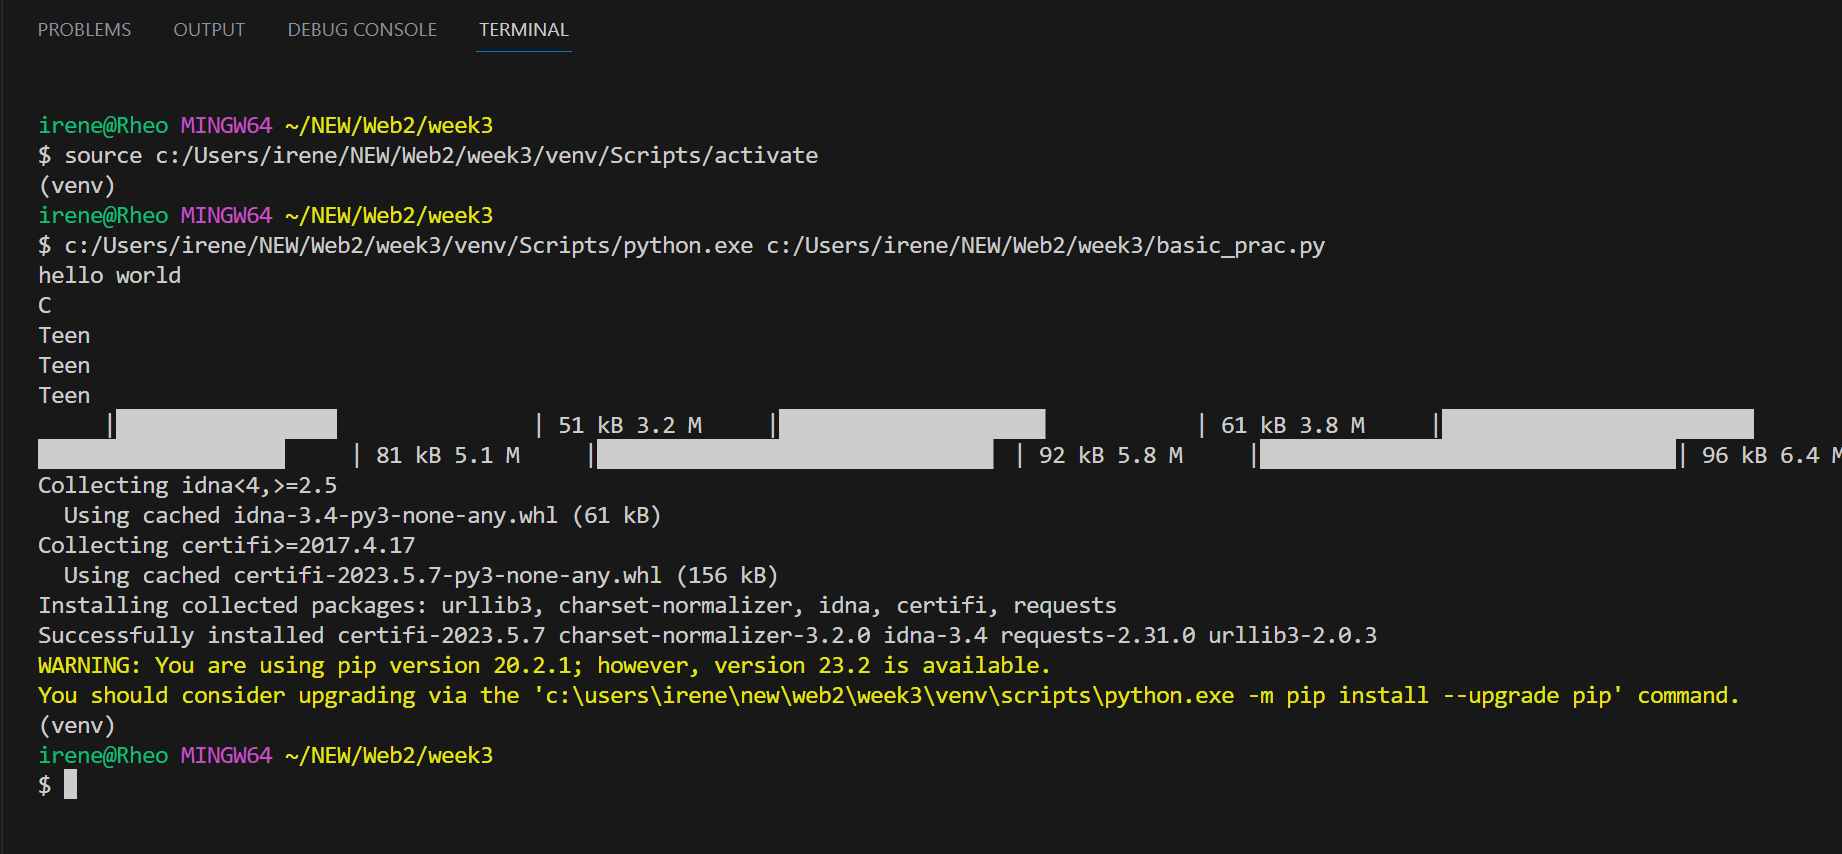
5) 반복
- 반복문은 리스트와 함께 쓰인다!
ages =[5,10,13,23,25,9]

for a in ages:
	if a>=20:
		print("Adult")
	else:
		print("Teen")
5. Python 패키지 설치하기
1) 가상환경 venv 설치
더보기

- 프로젝트별로 쓰는 패키지가 다를 수 있으니
프로젝트별로 패키지를 담아두는 가상환경을 만들어준다! - 가상환경(Virtual environment) : 같은 시스템에서 실행되는 다른 파이썬 응용 프로그램들의 동작에 영향을 주지 않기 위해, 파이썬 배포 패키지들을 설치하거나 업그레이드하는 것을 가능하게 하는 격리된 실행환경.
1) 터미널에 'python -m venv venv' 입력
- Yes 눌러주고
- 폴더 아래 venv 폴더가 생긴 것을 볼 수 있다.
2) venv 활성화하기
더보기


- ./venv/Scripts/activate 입력
- 오른쪽 아래 인터프리터 선택 눌러서 > Python 3.8.6 선택
- 터미널에서 파이썬 실행
- 터미널 맨 아래에!!! (venv) 잘 뜨는지 확인 ➡️ 이게 진짜 중요하다!!
3) requests 패키지 설치해주기
더보기
pip : python install package
pip install requests설치가 잘 됐다고 뜨면 완료!
6. Requests 패키지 사용해보기
더보기


- requests.get()을 통해서 데이터 받아오기!
import requests

r = requests.get('http://spartacodingclub.shop/sparta_api/seoulair')
rjson = r.json()

print(rjson)
- 받아온 데이터에서 리스트만 뽑아내서 for문으로 돌려돌려 돌림
import requests

r = requests.get('http://spartacodingclub.shop/sparta_api/seoulair')
rjson = r.json()
rows = rjson['RealtimeCityAir']['row']

for a in rows :
    print(a['MSRSTE_NM'], ' : ', a['IDEX_MVL'])
- 문법은 검색해서 보고 쓰면 된다!
- https://requests.readthedocs.io/en/latest/
'Programming > WEB' 카테고리의 다른 글
| [9] 데이터베이스 : DB, mongoDB, 데이터 입력·출력·수정·삭제, python 파이썬, pymongo (0) | 2023.07.18 |
|---|---|
| [8] 파이썬 기초 : 크롤링, 웹스크래핑 기초 (0) | 2023.07.17 |
| [6] Javascript, jQuery : 서버-클라이언트 통신, Open API, JSONVue, Fetch() 함수 (0) | 2023.07.15 |
| [5] Javascript 기초 : jQuery 문법 (0) | 2023.07.14 |
| [4] Github에 웹페이지 배포하는 법, 사용법 : 페이지 배포 (0) | 2023.07.14 |
'Programming/WEB' Related Articles
more


